GameTacoFTW

How to Unlock All Submarines in Monster Hunter Rise

In Monster Hunter Rise, you’ll need to find items such as rock roses, bismuth prisms, and king rhinos to unlock all submarines. In this guide, you’ll find out where these items are, how to finish the requests, and some tips on how to unlock all 3 submarines as quickly as possible.

Unlocking all 3 Submarines in Monster Hunter Rise

One of your first priorities as a hunter in Monster Hunter Rise should be to unlock all 3 submarines from the Argosy. The three submarines will let you farm items very quickly, and give you the materials you need to make plenty of traps, bombs, and healing items. 

Rondine, the Argosy Captain located in the Buddy Plaza, will give you the first submarine shortly after your journey begins in Kamura Village. There are two additional submarines you can unlock – the second submarine is unlocked by doing a request called Cultural Exchange. The third submarine is unlocked by doing a request called Economic Stimulation. 

Cultural Exchange

Cultural Exchange is a request from Rondine in the Buddy Plaza. This request will unlock after you complete the 2-Star Urgent Village mission called Feathered Frenzy. This urgent mission will pit you against a Aknosom. 

After defeating the Aknosom, talk to Rondine to unlock the request. You’ll need to gather and turn in 3 Wisplanterns and 3 Boatshells. These can be gathered 

Where to find Wisplanterns

Wisplanterns are located in the Shrine Ruins and can be tracked via your map. Open your map and change the item filtering to the gather point called Shimmering Red Berries. Shimmering Red Berries have a chance to give Wisplanterns, so make your rounds to each of the locations on this map. 

There are several Shimmering Red Berries that are easily accesible. There is one gathering location right by base camp – cross the bridge and head down the northern pathway. You’ll come out to a ledge overlooking area 1, with a Shimmering Red Berry point.

Another is in the eastern most point of Area 1. Another is located by the Wyvern Nest in area 11. Also, there is one right by the Sub-Camp in Shrine Ruins

Wisplantern Locations on Shrine Ruins
Use this map to easily find the Wisplanerns in Shrine Ruins. Click to enlarge.

Where to find Boatshells

Boatshells are gathered from points called Oyster Beds in the Frost Island. Change the filtering settings on your map to Oyster Beds, and take a look through the watery areas of Frost Islands to find them.

When I gathered the Boatshells, I started in the ship graveyard section just north of area 4 – You’ll find two oyster beds there. From the graveyard, I went north toward area 10. You can go in a clock-wise pattern from area 7, sticking to the watery areas, to find several oyster beds. 

If you don’t find them on your first go-around, they respawn after several minutes. Alternatively, you can redeploy to the expedition. 

Boatshell Locations in Frost Islands
Use this map to easily find the Boatshells in Frost Islands. Click to enlarge.

After finding both Wisplanterns and Boatshells, head to Rondine in the Buddy Plaza to turn in your items. You’ll immediately unlock the second submarine. Make sure you have an idle buddy manage the submarine – you can hire an extra one, or remove duties from an existing buddy at the Buddy Board.

Economic Stimulation

To unlock the Economic Stimulation request, you must have defeated the Almudron in the Urgent Village Mission Hermit of the Swamp. Once the Almudron is defeated, Rondine will offer the Economic Stimulation request.

This request required 3 items: 1 King Rhino, 3 Rock Roses, and 3 Bismuth Prisms

Preparation

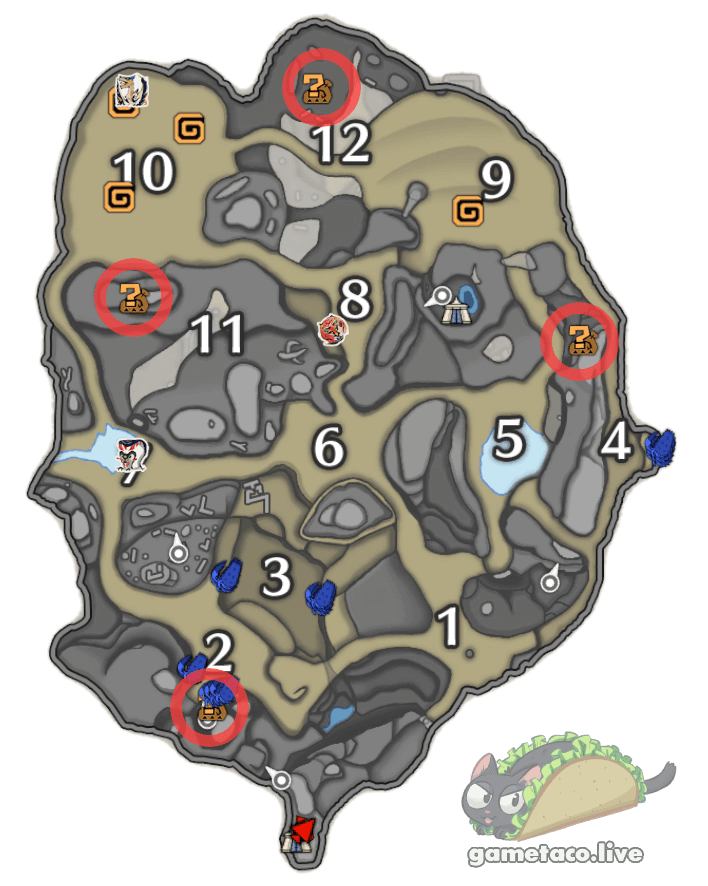
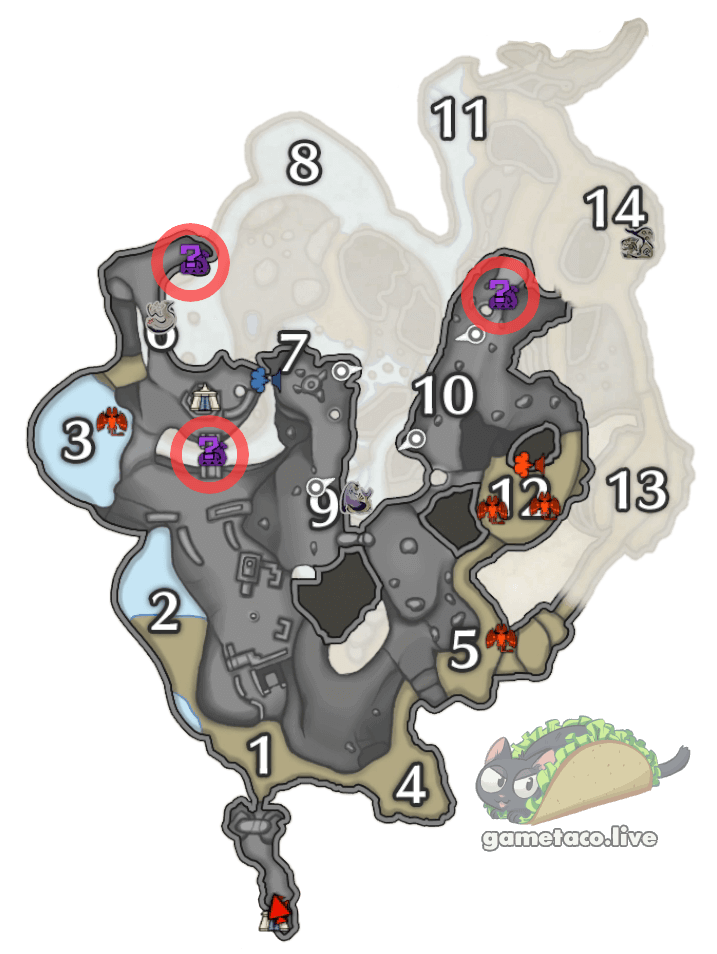
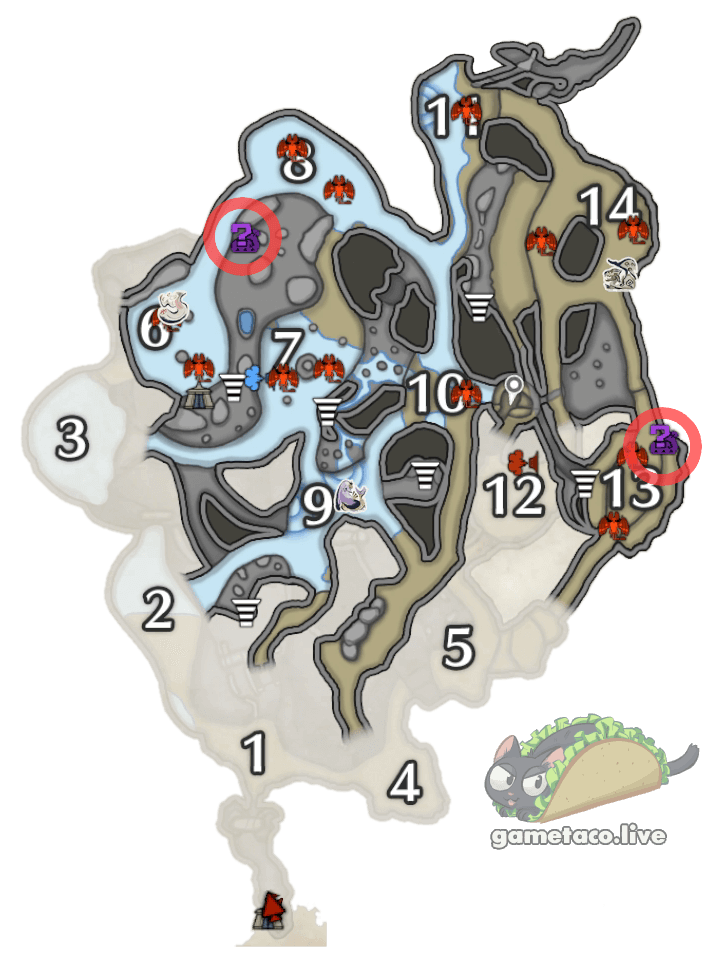
These items are much rarer compared to the Wisplanterns and Boatshells. There are a couple of optional things you can do to make your gathering much easier. 

Geologist Skill info in Monster Hunter Rise
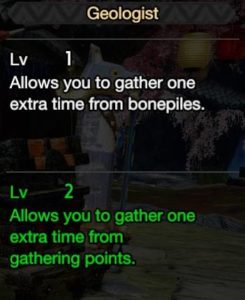
First, consider getting 2 points in the Geologist skill. The Geologist skill will let you gather multiple items from gather points, so we have a higher chance of getting our desired items. How you add this skill to your set is up to you –  I bought two pieces of the Leather Armor set (hands and legs). 

Second, the upsurges in each area may be beneficial. To check what items are being “surged”, go to your expedition details using the bumpers on your controller. An upsurge of Local Items will let us gather even more items from the gather points. If there is an upsurge of something else, say Mining, you can reset the upsurge by completing an easy 1-star Village Mission and returning to Kamura Village.

In my opinion, worrying about the upsurges is a little overkill. If one of your areas already has the desired upsurge, then prioritize it. But completing your missions to change the upsurge will probably take longer.

Under Locale Info, the Upsurge is listed. In the above screenshot, it is Local Items.

Where to find King Rhinos

Seeing as Economic Stimulation only requires 1 King Rhino, this is the easiest of the three items to gather. King Rhinos are located in the Flooded Forest. Before you head out, grab a barrel bomb. Change your item filter on your map to the Shining Rhino gathering point, and start making your way to each point. For the most part, these are fairly easy to find and your map will lead you right to them.

The quickest one to grab is probably the one located above the Sub-Camp. Jump out from the sub-camp cavern, and use your wirebugs to get on top of the mountain. There is a Shining Rhino waiting for you here. 

Another tricky one lies at the top of the large pyramid by Area 2. Climb the steps all the way to the top. At the top, there’s a collapsed doorway – use a barrel bomb to clear the debris and you’ll find another Shining Rhino alongside a Relic Record. 

Shining Rhino Locations in the Flooded Forest
Use this map to easily find a King Rhino in the Flooded Forest. Click to enlarge.

Where to Find Desert Roses

Desert Roses are gathered from Rock Roses in the Sandy Plains. Set your item filtering to the Rock Rose gathering point. Most of Rock Roses are located above ground and are fairly easy to get to.

There is one Rock Rose northwest of Base Camp, tucked away in the mountains. Another Rock Rose is located on the peak of the mountain directly south of Area 10. Next, go to the land bridge between Areas 9 and 10. If you look north, there is a small ruined wall. On the backside of this wall is a Rock Rose. 

The last two Rock Roses in the Sandy Plains are easily accessible from Subcamp 2. Go to Sub-Camp 2, exit the camp by droping down the large hole nearby. Continue on this underground path and you will come to a cavern with a single tree on top of a sandy cliff. At the base of this cliff is another Rock Rose. Lastly, exit from this room to the east and climb the vines leading to the surface. After the (quite long) climb, look to the left and you will find the last Rock Rose on this map.

Desert Roses in Sandy Plains
The Rock Roses located on the surface level of Sandy Plains. Click to enlarge.
Desert Roses in Sandy Plains
Rock Roses located on the underground level of Sandy Plains. Click to enlarge.

Where to Find Bismuth Prisms

Bismuth Prisms are gathered from Iridescent Ores in the Lava Caverns. The Iridescent Ores look like geometric cubes of varying colors, much like Bismuth in real life. Set your item filtering to the Iridescent Ores and get ready to traverse both the surface and subterranean layers of the Lava Caverns.

To start, I recommend heading to Sub-Camp 2, or the Sub-Camp in the Northwestern area. Just south of Sub-Camp 2, there is a broken bridge. There is a nearby path leading under this broken bridge with an Iridescent Ore on it. 

By the #6 on the surface level map, there is a crescent moon shape. At the top of this shape is another Iridescent Ore. After gathering this one, there is another one almost directly under you. Drop down to the underground layer, and climb one of the nearby pillars. At the top of a nearby pillar is an Iridescent Ore. 

Now head to Area 13. There is an ore in this area on the eastern side – just hop down over the little lip and you’ll find the ore tucked away to the north. For the last Iridescent Ore, take southwestern tunnel in area 14 to the surface. Just as you get to the surface, turn around and jump onto the top of the tunnel. Head north here, and you’ll come to the last Iridescent Ore in the Lava Caverns.


Bismuth Prism Locations in Lava Caverns
Iridescent Ores located on the surface level of Lava Caverns. Click to enlarge.
Iridescent Ores located on the underground level of Lava Caverns. Click to enlarge.

Reward

Now that you’ve gathered all the materials, return to Rondine to receive the last submarine! From here on out, you can quickly gather very useful materials you can use in your hunts. Personally, I like to have my buddies gather Thunderbugs, Godbugs, and Bitterbugs. This way I can have an endless supply of traps, powders, and catalysts. 

Thank you for reading through this guide! If you have suggestions the website, games to review, guides to make, or would like to contribute to this website, please let me know.  This guide & video took many hours to write, edit, proofread, and record. In the meantime, I have other guides on Monster Hunter Rise such as How to Find all the Relic Records in Frost Islands. Alternatively, you can watch my video game reviews! I recently reviewed Tiny Tina’s Wonderlands.

Share This Page:

Search for a Video or Post